Java Contactor is a cross-platform, contact management, scheduling and email marketing tool. Java Contactor runs on all these platforms: Microsoft Windows, Macintosh, Sun, AIX, Linux, BSD, HP-UX.


Today:
Exporting ContactsThe Java Contactor provides a contact export wizard that can be used to import Java Contactor databases to other contact managers, such as an email application, or Palm Pilot. Start the wizard by choosing Tools->Export, and choose a location to export the database file. The exported contacts are in tab-separated form if they need to be imported into another contact management system. Another use for exporting contacts is to sync up different Java Contactor databases. If you maintain one contact list at work for work contacts and another at home for personal contacts, simply export one of the databases and import into the other one to bring new updated contacts from one system to the other. After exporting the database on one system, import it on the other system by using the merge function. See the Merging Lists section for more information. Merging ListsThe Java Contactor can merge distinct Java Contactor databases. This feature is particularly useful if you maintain a contact list at work and one at home and would like to keep both lists synched up. The merging wizard starts up when selecting the Tools->Merge menu item. The wizard displays a file chooser that is used to navigate to a Java Contactor database. After selecting the database to merge with, the wizard displays a window for each contact that is new or has changed as shown below. If you maintain one contact list at work for work contacts and another at home for personal contacts, simply export one of the databases and import into the other one to bring new updated contacts from one system to the other. After exporting the database on one system, import it on the other system by using the merge function. See the Exporting Contacts section for more information on exporting contact lists. Importing ContactsThe Java Contactor can import contacts from an external contact management system as well. The import wizard can either import all contacts and merge with the current ones (Tools->Import and merge), or import all contacts and replace all the existing contacts (Tools->Import and replace). The import wizard has 2 windows in which to guide the import process. The first step is to choose a file to import using the file chooser. The Java Contactor can import contact files that are in tab or comma separated format. Pick the fields from the "Available Fields" list on the left-hand side of the import wizard window and move them over to the right-hand side. The left-hand side contains all the possible fields that can be used in the Java Contactor. The right-hand side will contain the fields to pick from the import file. The fields at the top of the "Fields to Import" list are the leftmost fields in the import file, and are read in one field at a time according to the order chosen in the "Fields to Import" column. Use the "Move up" and "Move down" buttons to change the order, and select either "tab" or "comma" for the separator type. When ready to import, click the import button, and begin to merge the lists (if you choose import and replace, then the Java Contactor simply imports all the contacts without checking each contact to see if it already exists in the database). See the Merging Lists section for a description of how merging takes place. Email MarketingTo send email to a list of matching Contacts, choose Contact->Email Matching Contacts from the Contact menu. The email Contacts wizard starts up. There are 4 windows in the Java Contactor email wizard. 2 of the windows are conditional windows depending on the state of the contacts that are part of an email marketing distribution. The windows are described below. Fix Email Addresses -(conditional) This wizard window appears when contacts do not have an email address. The 'More Info' button can be clicked for each contact missing an email to show the complete contact information. Enter the email address in the text field provided or select the checkbox to skip this contact if an email address is not available. Click on the 'skip all' button to select all the checkboxes. Select Email Addresses - (conditional) This wizard window appears when contacts have more than one email address. Use the combo box to select the appropriate email address to use. Confirm Email Addresses - This wizard window appears allowing individuals to be deselected from the distribution. For example, use this option to send an email to a subset of the recipients in a group. Mailer - This wizard window appears to show the email distribution to be sent. Fill in the subject field and the email contents and click the 'Send email' button. The 'From' email address and the SMTP server are listed in this wizard window but are not editable. Change these fields in the Java Contactor preferences instead. If the email is being sent in HTML mode, then there are 2 tabs available in the mailer wizard window, the HTML source and Preview tabs. Make changes in the HTML Source tab and preview the email in the Preview tab. The Java Contactor can render HTML version 3.2 source accurately. CSS and JavaScript support is limited. If the email is being sent in plain text mode, there is only one tab, called the Text-based email tab. For plain text emails, the window serves as both the preview and the editing window. Direct MarketingUse JC to segment contact groups such as by city, state zip code or group and then conduct direct mailing campaigns using the built-in Avory style mail label printing wizard. Using JC is much easier than performing a mail merge in other programs because the database is part of the application, and JC automatically scales mail addresses to fit the label size chosen.
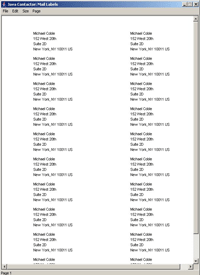
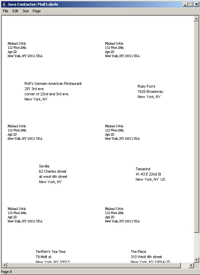
Printing Avory Style Mail LabelsUse JC to print Avory style address labels to contact segments, such as all contacts belonging to a group and/or contacts in a certain city, zip code or state. Use the Java Contactor search fields to narrow down the list and then choose “Mail Labels” from the tools menu. The mail labels wizard provides services to print Avory style mail labels for all matching contacts. The window displays the contacts as they would be printed using the default Avory mail label (1/2 x 1 _ ). Use the Page menu to switch to the page that you'd like to display. Use the Size menu to change the size of the Avory labels. When choosing the size labels of 2 x 4 or 3 1/3 8 x 4, the return mail address dialog box is displayed. Use this dialog to pick the contact that will be on the return mail address and the display will show the return address along with the delivery address. Both are printed on the larger label sizes. Use the return mail wizard to print the same address to Avory mail labels. Pick a return mail address from the return mail dialog and the wizard displays one page on the display. To print multiple pages of return mail addresses, enter the desired number of pages to print the number of pages field of the print dialog. Print copies of the Avory labels using the File menu by clicking Print. The print dialog will be the standard print dialog for the operating system and offers the ability to print a range of pages and the number of copies. To print multiple copies of return mail labels, enter the number of copies to print in the number of copies field on the print dialog. To print only a subset of labels, enter a range of pages to print when printing mail labels. Menu ItemsPage Menu
Size Menu
File Menu
Printing Contact Lists
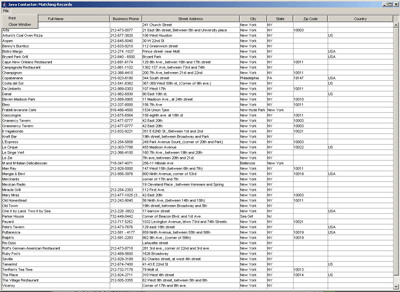
The Java Contactor can print contact spreadsheets of the currently matching contacts or can be used to copy-paste contact lists to Excel to format and distribute lists of contacts. Use the Java Contactor search fields to narrow down the list and then choose “Contact Spreadsheet” from the tools menu. The matching contacts are displayed in the contact spreadsheet wizard. Choose which columns to display by setting preferences. Mouse over the columns and resize them by pulling them wider or narrower. Drag and drop columns to different locations by dragging and dropping them. Once the desired layout is achieved, print the contacts using the “Print” item on the File menu. Copy and paste the data by selecting all the rows and columns and pressing Control-C to copy the contacts to the system clipboard. Paste these contacts into Excel, Word or other program. File Menu
|
||||||||||||||||||||||||||||||||||||||||||||||||||||||||||||||||||||||||||||
|
|
||||||||||||||||||||||||||||||||||||||||||||||||||||||||||||||||||||||||||||
|
||||||||||||||||||||||||||||||||||||||||||||||||||||||||||||||||||||||||||||
|
Copyright © Smiling Dog Applications, LLC 2006
|
||||||||||||||||||||||||||||||||||||||||||||||||||||||||||||||||||||||||||||